...where I share my life, craftiness and eating habits with the world...

Thursday, December 20, 2012

Oreo Ball FAIL

So, has anyone ever made Oreo Balls?
If you do not know, they are these little balls of yummy sweet goodness.  I mean it, really de-lish.
Here is a pic of what they look like.  Yum.

And here is what mine look like.
*sigh*
I worked so hard on them...
really, really hard.
I had a major cooking meltdown.  I felt like a toddler who didn't get her way.  I cried and yelled and went to my room and laid dejected on my bed.  (Dramatic?  yes.  Unwarranted? no.)
I really expected my first batch to turn out perfect.
Really.
I learned a good lesson that day.
There is no such thing as an epic fail if the end result tastes good.
Are they good?
Heck Ya!
Thanks for reading!


Thursday, November 29, 2012

Super BIG Glitter Stockings

A couple of years ago I decided we needed bigger stockings.  I searched all over everywhere for something I liked, but...I am very picky when it comes to decor(nothing tacky or super gaudy)...  So I decided to make my own.
These were super easy and I love the way they turned out.
My aunt had these super large stockings, so I traced one for my pattern.  I used glitter felt.  I didn't have to hem anything or worry about fraying.  The felt is also sturdy enough to hold up without interfacing.  I got this wonder product at Hobby Lobby.  :)
 
 
I used iron-on letters for our names.


Here is a pic of the stocking on my cutting board so you can get a rough estimate of the size.
 
 
Thanks for reading!


Sunday, November 18, 2012

Damask Tree Skirt

I bought a new Christmas Tree.   I have a really small house and it is hard to fit a tree in anywhere.  It is a super skinny tree and I really love it. The only problem?
The tree skirt I had was way too big.
So, I made a new one.

It was so easy.
The trick to getting a perfect circle???
I used a circle skirt pattern.  :)
This one to be exact.

 
I got it a Joann Fabric when patterns were $0.99!  I used it to make a circle skirt for my daughter to wear with her Vintage Lucy's Lemonade Stand Tee.
She loved it(too bad it doesn't fit her anymore).

 This was her first trip to the beach.  :)
 
But I digress...
I used the size 7 pattern because I did not want a skirt that is too big.  It ended up being the perfect size.
In order to make it a tree skirt I had to slit it up the back and I added some interfacing to make it thicker.  Then I edged it all in green seam binding.
I really love the way it turned out, and it is the perfect size for my little tree, in my small house.  And it matches all my other holiday decor perfectly.  :)
 
Thanks for reading!


Sunday, November 11, 2012

Monster High Crossbody Bag

I don't know about your tween daughter, but mine seems to just LOVE Monster High, as well as all her friends and my nieces...
I had one such niece's birthday party yesterday.  Luckily I already had this idea in my head of a gift to make her.
I was out shopping the day before and I was looking at all the Monster High stuff and I just knew I could make something waaaay cuter than all the cheap junk the store had.
So I did, isn't it super-cute?


Basically I followed these 2 tutes, here and here.
It is a super quick little bag to make, and super perfect for a one of a kind gift.
 
I think the hardest part was making the skull and eyes patterns.
I google image searched "monster high skull" and drew it out myself.  I did the eyes a few times because I am a perfectionist and they just didn't look right to me the first time.  :)

 
The first thing I did was lay out the squares in a color scheme that I liked.  I went for an alternating pink/black pattern.
Then I laid out the skull shapes where I liked them.
 
I sewed the squares together and appliqued the face on.
For the eyes I just sewed around the circles.  I left the eyelashes loose.  For this bag I only made one side patchwork.  The back and the lining are solid pieces of fabric.  This allows for a faster turnaround time.
 
The strap and bag are lined with interfacing to give it structure, like in the ruffle bag tute.  The size of the bag is more like the little girl patchy bag.  The right side out outer bag goes into the inside out lining.  But before I put it in I pin on the straps and tuck them in too.


My niece loved it.  Next in the works is a green and black and white one like Frankie Stein, for another special girls birthday.
Thanks for reading!
 

Monday, October 29, 2012

Jack Skellington Pillow Cover


I pinned this great pillow cover last Halloween here.
I knew I could make a similar one because I love Jack so much!  It is one of my all time favorite movies and my kids love it too!
The best part?  It was really easy!!
 
Here's a list of supplies
  • 2 fat quarters(any color you want)
  • Approx 10 inch square of white fleece or felt
  • 8x10 inch piece of black fleece or felt
  • sewing machine, thread, etc.
  • 14 inch pillow form
I like to change my pillows to match the season or the holiday so it is way easier to store a cover opposed to a whole pillow.  Plus I have young children so it is easy to wash if you do it this way.
 
First thing you do is trace something round onto your white piece of fabric.  I used a standard size dinner plate.  I also used my rotary cutter and mat to make this part super simple.


 Next I ironed the fat quarters to make them crease free and cut one into a 15x15 square.(Next time I will do a 16x16 so it gives some wiggle room).  The other one I cut into approx a 15 x 22 rectangle.  Basically just cut 3 inches off of the long side.  Then I free-handed the facial features.  The eyes I styled off of pictures I googled and the nostrils are tiny teardrop shapes.  The mouth stitches are too wide here, I cut them each in half length-wise before sewing them on.  It was simple, I promise!


 I sewed on the head with white thread in a zigzag stitch.

Then I sewed on the eyes and nose with black in a basic stitch.  Then the mouth in the same way.  That was the time consuming part.  

 
The 15x22 inch piece got cut in half to make the back envelope part of the cover.  So the pieces are approx 11x15.
 

I did a fold over hem on one 15 inch side of each back piece.  Next, I overlapped both back pieces and matched them up to the outside edges of the cover front.  Right sides together of course!


The last thing to do, is sew around the whole square cover.  After you are done, turn it right side out through the envelope back that you just made, and VOILA!  Pillow cover!!!


I think it looks awesome!
Thanks for reading!
 

Monday, October 22, 2012

Little Girl Patchy-Bag

I have a birthday party to go to this weekend.
For a very special little girl and I wanted to make her something that is as fun and vibrant as she is.
This is the perfect size bag for a soon to be 9 year old.
 It is also a cinch to make out of all those little scraps of fabric that you thought were of no use.
I simply modified the Shabby Chick Ruffle Bag tute here.
I made the squares 4x4 and the lining 11x10.
11 across and 10 vertically.
(does that make sense?)
The notches out of the bottom are only 1 inch & the strap can be any length you want.
I used as many different kinds of fabric as I could.
I think it turned out super cute!
 She's going to love it!!!
 
 
Now I just have a few more to make so I always have one on hand for those last minute school party invites.
That always get "found" by my daughter at the last minute.


Friday, October 19, 2012

My Halloween Decor

Do you decorate for Halloween?
I do!
Halloween is my favorite!!!!
Here is a little peek of some of my Halloween decor, I hope it inspires you to decorate your house.  :)
My makeshift "mantel".  I love my Jack-o-Lantern Scentsy!
(I don't have a fireplace)
 
 
Here is a side table with some Halloween pics of my babies through the years...so cute!
 
 
The graveyard my awesome hubs made for me.
 
 
The banner(I got a Target) that I hang over my frame wall.
 
 
(More Target)
 
 
Kitchen
 
 
Hubs made me this skull.  I think it looks like it has a big bushy mustache, but hey, mustaches are in right??
 
My entry is a tad blah, maybe I'll make it over next spring!
B/c you know, paint is magic!
 
 It's glittery, but in this pic you can't tell.

Hope you enjoyed the pics of my Halloween decor.  I like to go all out, but I do not like those inflatable things.  They are big and obnoxious and I wish I could just drive down the road and shoot at them with BB guns!  lol
Hope you have a safe and happy Halloween!


Wednesday, October 17, 2012

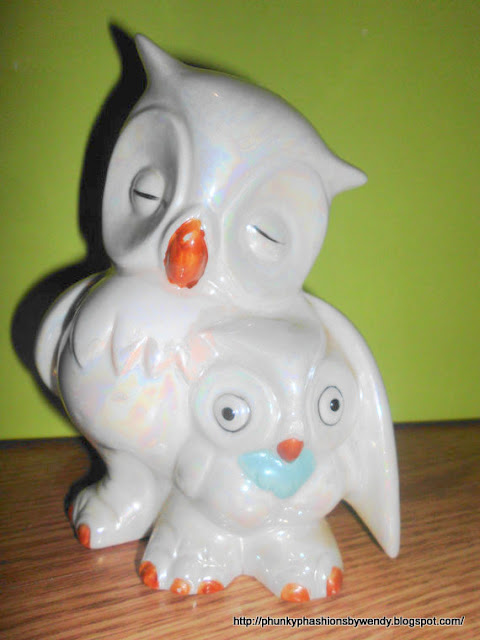
Sweetie Pie Owls

Is this not the cutest owl figurine ever?
It is an adorable Mama and Baby Owl, see how she protects her beautiful wee one with her wing.
So sweet, so loving, so pretty...
 
OMG!  What is the hideous thing!?!
It's horrible, and ugly, and terrifying!
That cannot be the same beautiful figurine as above?
It sure is.
 
Isn't it amazing what a little paint will do?
I used Rust-oleum Painters Touch Spray paint in Key Lime.
It is great paint!  It only took 2 coats to cover the ugly.
I almost didn't buy this little guy because I wasn't sure if it was salvageable.  Thank goodness for my hubs!  He told me it would be OK, and he was so right.  :)  It only cost $1.99, such a steal!
Owls are all the rage right now too, in nursery's and children's rooms.  This little duo is going into my bedroom to remind me of my sweet wee ones.
The only thing that would make it better is if there were 2 owlets.
 
Thanks for reading!